Virtual memory is a method of using the computer hard drive to provide extra memory for the computer. A paging file is an area on the hard disk that Windows uses as RAM when you run out of the available RAM. This guide describes how to set appropriate virtual memory size for all Windows PC.
Some people may tell you that you should that the page file size should be 1.5x, 2x the amount of memory installed. However, this point does not take into consideration other important factors and system settings that may be unique to your computer.
To optimize Windows better performance, it is proper that we should let Windows system manage the best initial, maximum, and minimum settings for their virtual memory page fill. There are three major reasons:
1. Have too larger page file will add extra work for your hard drive, causing everything else to run slower, especially slow the restart and shutdown speed.
2. Too small pagefile size can reduce system performance and cause instability and crashes within Windows.
3. The best choice is to let Windows manage the page file on the primary drive. If your computer is using its page file a lot, we recommend adding more RAM to the computer instead of increasing the page file size.
Step 1: Open System Properties.
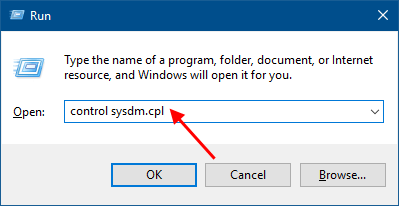
Press Win+R to open the Run dialog, type in control sysdm.cpl, hit Enter key.

Or you can press combinations keys: Windows + Pause Break to open the System window. In the left pane of System, click Advanced system settings.

Step 2: In the System Properties window, select Advanced tab, under Performance, click the Settings.

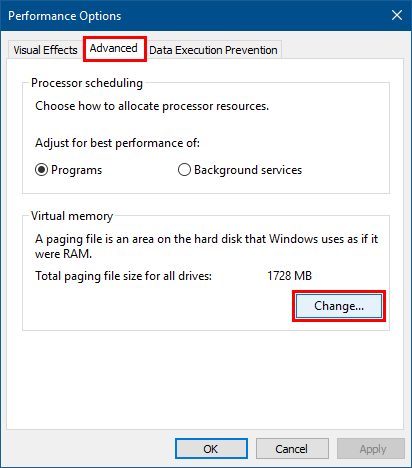
Step 3: Click the Advanced tab, and then click the Change button in the Virtual memory section.

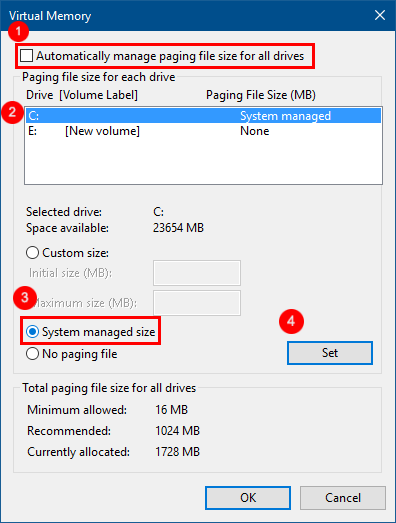
Step 4: Clear the Automatically manage paging file size for all drives check box.
Select a drive (C:) that you want to have its paging file size system managed. Select System managed size option, click Set button. When done, click OK.

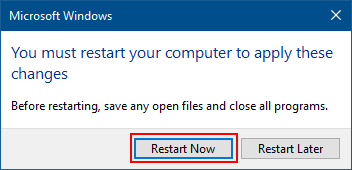
Step 5: To make this setting take effect, you'll need to restart your computer.
