Nowadays, disk cloning is widely used in computer hard drive replacement or upgrading, because it can avoid the hassle of data loss or reinstalling the Windows system. However, some users experience booting problems after cloning Windows 10 to SSD. They found that the computer could not boot from the cloned SSD. What's going on? Now, on this page, we will show you how to make your computer boot from SSD after cloning Windows 10.
First, you need to know that whether the computer can boot successfully from the cloned SSD depends on the partition style (GPT/MBR) of the SSD and the BIOS mode (UEFI or Legacy BIOS) of the computer. All desktop PCs and laptops boot up using one of two ways: the traditional BIOS-MBR method and the newer UEFI-GPT method, depending on the motherboard manufacturer. Generally, old-fashioned motherboards use Legacy BIOS mode and support only MBR disks. Most modern motherboards support both UEFI-GPT and BIOS-MBR mode, but sometimes only one mode is enabled by default. Of course, there are a few new motherboards that do not support BIOS-MBR mode. If necessary, please check the following two links to check your BIOS mode and partition style.
To ensure that your computer can boot successfully from the SSD after cloning, you need to initialize the SSD with the correct partition style before cloning. In short, if your BIOS mode is Legacy BIOS, initialize the SSD using MBR. If your BIOS mode is UEFI, initialize the SSD using GPT. Choosing the same partition style as your computer's existing hard drive is always a safe bet. Follow these steps.
1. Install the SSD properly into the slot inside the computer, or connect the SSD to the computer externally through the USB port, depending on your own needs.
2. Right click the Windows icon and select Disk Management to open Disk Management in Windows 10.
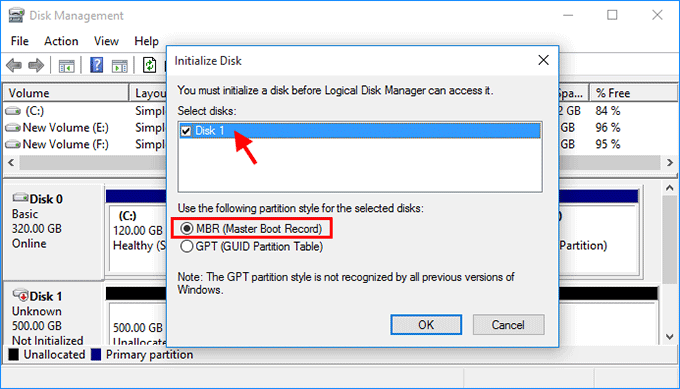
3. An Initialize Disk dialog pops up along with the Disk Management window. Select the connected SSD drive (generally Disk 1), choose the right partition style (MBR or GPT), and then click OK. The new SSD will be initialized.
Tips: If you have initialized the SSD using a partition style that is not supported by your computer's BIOS mode, simply change the partition style to the correct one.

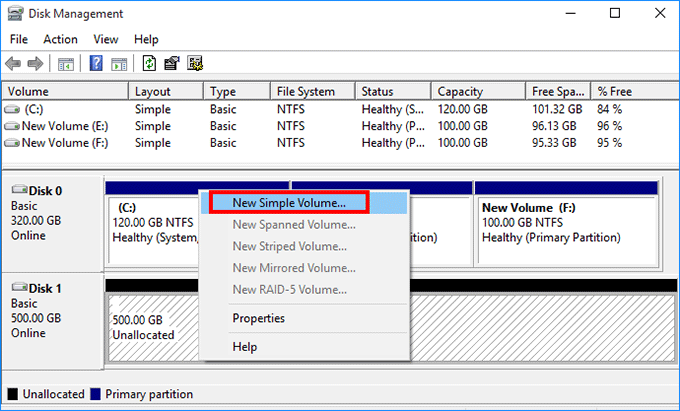
4. Right click on the space behind the new SSD, and select New Simple Volume. Then follow the on-screen wizard to create a volume and assign a drive letter for the SSD.

To make sure that the SSD is bootable after cloning Windows 10 to it, you need to choose professional and reliable disk cloning software to clone every bit of information needed to boot Windows 10. We recommended that you use iSumsoft Cloner. It can accurately clone Windows OS and partitions, and remain the cloned target SSD drive bootable. Follow these simple steps.
1. Download and install iSumsoft Cloner on your computer. After installation, launch the software.
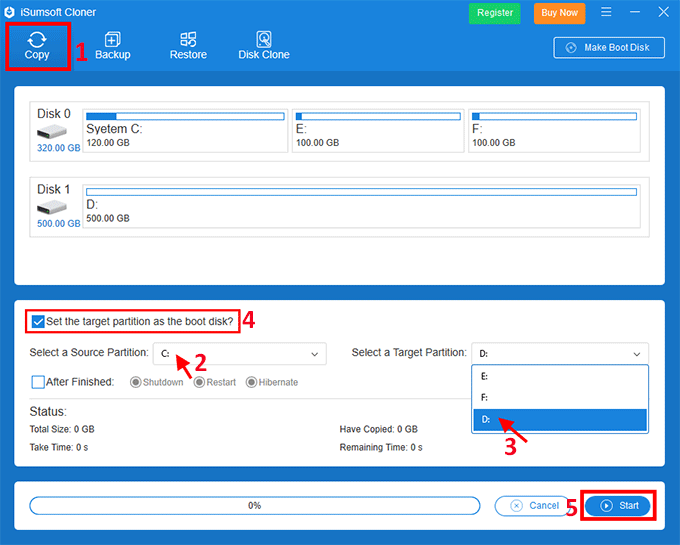
2. Select the Copy option. Select the C drive (the drive on which your Windows OS is installed) as the source drive, and select the SSD drive as the target drive. Make sure the "Set the target partition as the boot drive" option is checked and then click on Start to start cloning the Windows 10 OS to the SSD.

3. Just wait for the cloning process to complete. This takes about 15 minutes, depending on the source drive (C drive) capacity.
Now it's time to make the computer boot from the cloned SSD. Follow these steps.
1. Start or restart the computer and continuously press the BIOS key (generally F2, Esc, Del, F12 or other keys, depending on the motherboard manufacturer) to access the BIOS screen.
2. Go to the Boot tab to set the computer to boot from the cloned SSD. If your BIOS mode is Legacy BIOS, change the boot order and set the cloned SSD as the first boot device. If your BIOS mode is UEFI, just choose the cloned SSD as the boot drive.

3. Save the changes and exit the BIOS screen. Your computer will boot from the cloned SSD successfully. In other words, you've set the cloned SSD as your computer's primary boot drive, and the old hard drive becomes the data storage device.