C drive is what we usually call "system drive" in Windows. If the capacity of the C drive is not big enough or the C drive is running out of free space, you may want to merge the D drive to the C drive to extend the C drive. However, it's essential to note that merging two partitions can cause data loss. So how to avoid data loss when merging C drive and D drive? Now this post will show you how to merge C drive and D drive in Windows 10 without data loss.
In order to avoid data loss on the D drive, backing up the data correctly before merging the D drive to C drive is the key. Follow the steps below.
If there is a little amount data on your D drive, you can simply copy and paste the data to another partition or external hard drive for backup. However, if you have mass data on the D drive and want to keep all data intact, a third-party partition cloning tool will be the best choice. iSumsoft Cloner helps to backup the entire partition safely and quickly.
1. Download and install iSumsoft Cloner for free on your Windows 10.
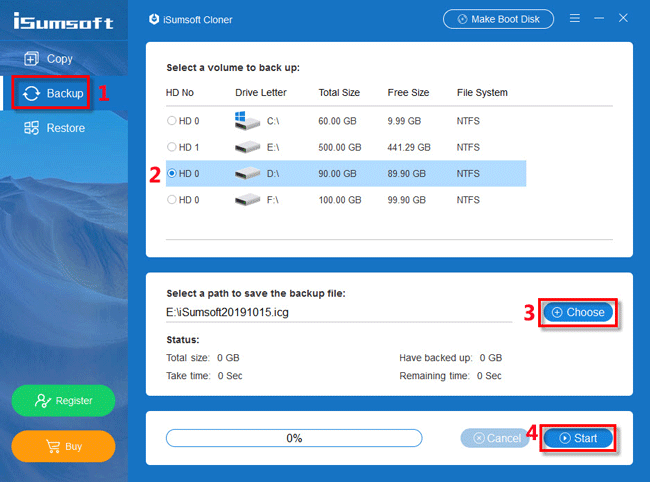
2. Launch iSumsoft Cloner and select the Backup option on the left side. Under the "Select a volume to back up" section, select your D drive. Under the "Select a path to save the backup file" section, click on Choose and choose a location to save the backup file. Then click on Start to start backing up the D drive. All data on the D partition will be backed up to a separate file whose filename suffix is .icg.
Now that you have backed up the data on the D drive, you can safely merge the C drive and D drive in Windows 10 without worrying about data loss.
1. Press Win + X and select Disk Management to open the Disk Management in Windows 10.
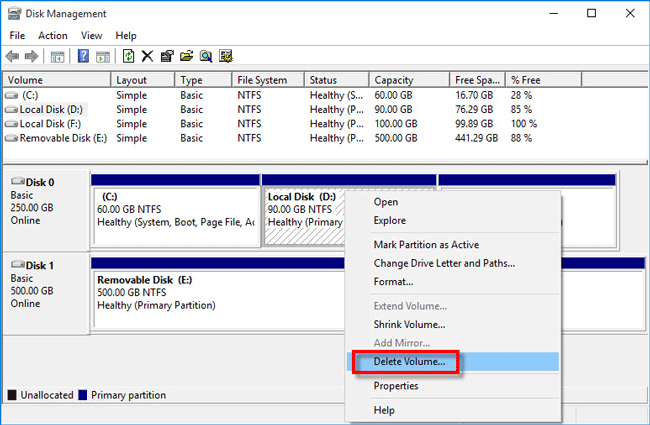
2. Right click on the D partition and select Delete Volume. Once the D volume is deleted, it becomes unallocated space.
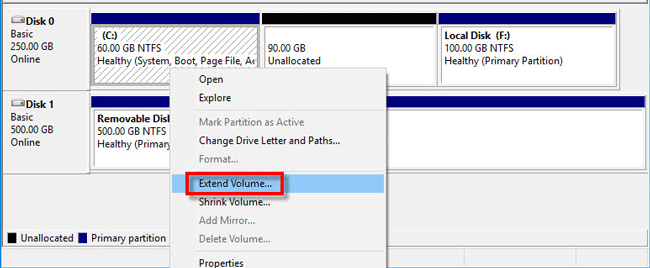
3. Right click on the C drive and select Extend Volume. When the Extend Volume Wizard opens, click Next > Next > Finish, so the entire D drive will be merged to the C drive immediately.
Now that you have merged C drive and D drive in Windows 10, you need to restore the data on the original D drive to ensure no data loss. If you want to restore the data to an external hard drive, go directly to the Step 4. If you want to restore the data to a partition on your local disk, you first need to take the following steps to create a new D partition for holding the data.
1. Open the Disk Management tool. Right click on a partition that has lots of free space and select Shrink Volume.

2. When the Shrink dialog opens, enter the amount of space to shrink and click the Shrink button.
3. An unallocated space will be generated behind the drive. Right click on the unallocated space and select New Simple Volume.

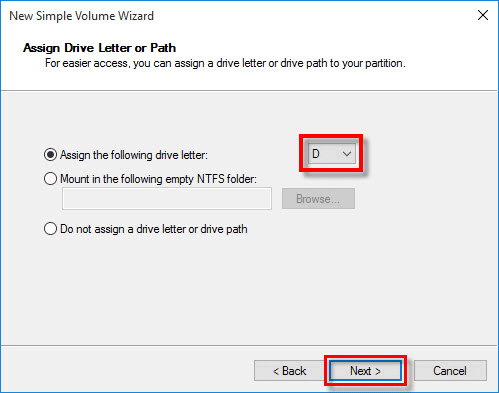
4. When the New Simple Volume Wizard opens, click Next > Next. Assign a drive letter D to the new volume and click Next > Next > Finish. This will create a new D partition.
Now you can restore all data on the original D drive using the backup file.
1. Launch iSumsoft Cloner and then select the Restore option on the left side.
2. Under "Select the restoration destination" section, select the drive which you want to restore the data to. You can select an external hard drive or the new D partition you just created in Step 3. Under "Select a backup file to restore" section, click on Choose and choose the backup file of the original D drive. Then click on Start to begin restoring the data.
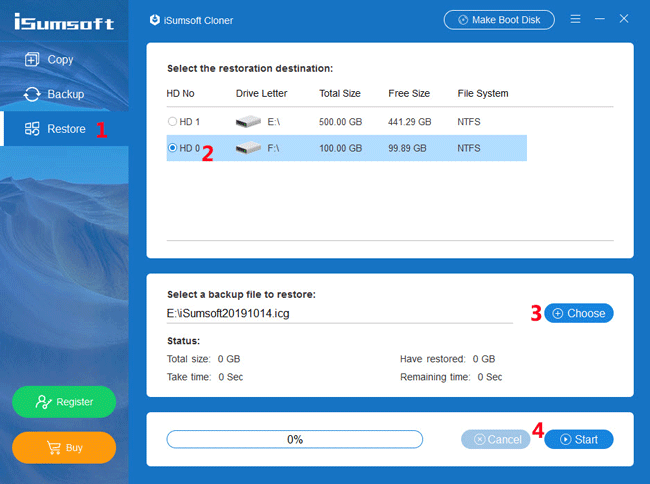
3. Wait for the restoring process to completed. All data on the original D drive will be restored to the destination drive.
The above are the complete steps to merge C drive and D drive in Windows 10 without losing data. Of course, there are third-party partition management tools over the net that can help merge C drive and D drive without losing data, but they need you to pay.