Recovery partition is a special partition on system hard drive and is used to restore the system to factory settings in the event of system issues. To protect recovery partition from being changed or deleted, recovery partition usually has no drive letter, and only a Help option is provided in Disk Management.
There are two types of recovery partitions in a pre-installed Windows 10 system.

One is created by installing Windows on GPT disk, which holds the Windows Recovery Environment (WinRE). Typically, Windows recovery partition only takes up several hundred MB disk space, as it only contains the bare operating system. Therefore, it is recommended to keep the Windows recovery partition.
The reset is created by computer manufactures like Dell, HP, Lenovo before delivery. This recovery partition contains an image of everything pre-installed along with the operating system, which allows to restore computer to factory default settings. Suppliers' recovery partition takes more space than Windows recovery partition, and is usually marked as OEM Partition.
However, the recovery partition can be removed under certain conditions to obtain more hard drive space. If you have upgraded to Windows 10 from previous Windows system, then the factory default recovery partition will not work normally. In that case, you can delete this recovery partition and free up disk space.
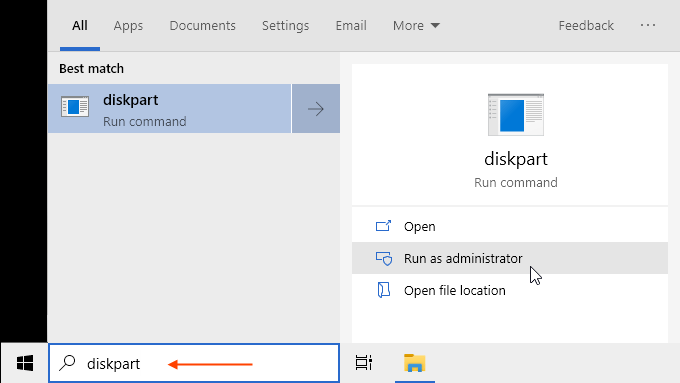
Step 1: Type "diskpart" in the search box, then select "Run as administrator" in the results.

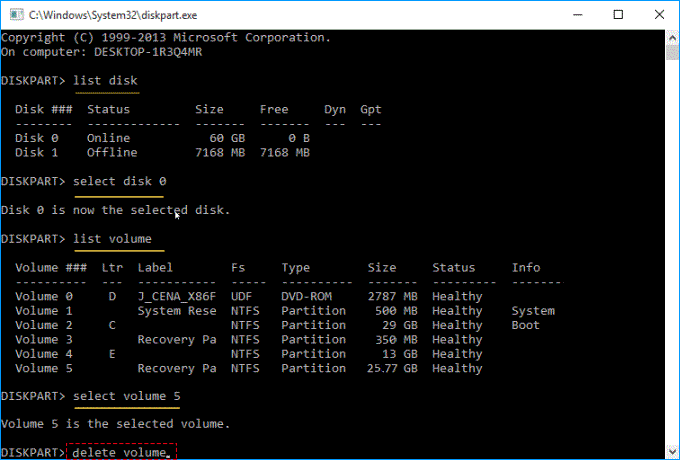
Step 2: At a Diskpart prompt, type in list disk and press Enter to display all the disks.
Step 3: Type select disk # (where # is the number of the disk with the recovery partition) and press Enter.
Step 4: Type list volume and press Enter.
Step 5: Type select volume # (where # is the number of the recovery partition) and press Enter.
Step 6: Type delete volume and press Enter.

Step 7: Deleting a recovery partition will create a section of unallocated space on your drive. In order to use the unallocated space, you must format the partition. Then you can expand a partition to use the unallocated space.
Windows 10 doesn't allow you to delete the existing recovery partition without creating a new USB recovery drive. If you want to remove the recovery partition to increase the space on the primary (C:) drive, you can create Windows recovery disk with a USB drive, and then Windows 10 will give you an option to delete the OEM recovery partition.
Step 1: In the search box next to the Start button, search for Create a recovery drive and then select it.
Step 2: When the tool opens, make sure Back up system files to the recovery drive is selected, then select Next.
Step 3: Connect a USB drive to your PC, select it, and then select Next.
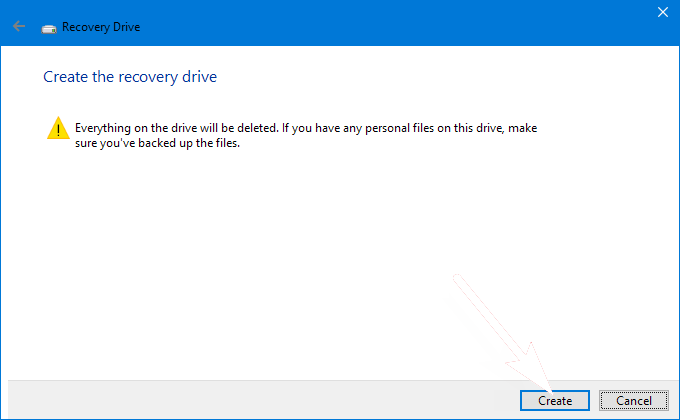
Step 4: Select Create. Many files need to be copied to the recovery drive, so this might take a while.

Step 5: After done, restart your PC. Then you can delete the recovery partition in Disk Management.
Right-click the Start button then choose Disk Management option to open it. Right-click the Recovery partition (D:), and select the Delete Volume option. Follow the on-screen instructions to delete the partition, and the allow the computer to restart.