Are you trying to install Windows 11 on a new SSD without USB or DVD? If you follow the official method supported by Microsoft, it is not possible to reinstall Windows as you're required to create a bootable driver. However, if you prefer an alternative approach, the most common way is to migrate the installed Windows 11 to the new SSD, which doesn't need a flash driver.
In this article, we will guide you through the process of installing Windows 11 on a new SSD without relying on a USB or DVD. Let's begin!

After many experiments, an ISO file alone cannot be directly used to install Windows 11 on a newly added SSD without a bootable disk. When you install Windows 11, it will be installed on the default system drive, which is typically labeled as the "C" drive. During the installation process, Windows 11 will automatically select the system drive as the destination for the operating system installation.
Shadow Copy is a free tool that can assist you in transferring your system to a new SSD. Unlike professional cloning software, Shadow Copy operates through command lines, making the migration process somewhat intricate, involving a total of 37 steps. Learn how to utilize Shadow Copy to install Windows 11 on a new SSD without a USB.
iSumsoft Cloner is a software tool designed for disk cloning, system migration, and partition cloning. With Cloner, you can easily transfer your Windows 11 to a newly added SSD without a bootable driver. Furthermore, it provides a user-friendly interface for performing cloning tasks and supports both HDDs and SSDs.

Here's the tutorial in detail:
Step 1: After starting computer, right-click on the Start icon and select Disk Management.

Step 2: A dialogue box will pop up, asking you to initialize the new SSD. Select the added hard drive and check the GPT (GUID Partition Table), then click OK.

Step 3: Right-click on the new SSD and select New Simple Volume. Then you need to follow the wizard to allocate space and size to the disc.

Step 4: Download and install iSumsoft Cloner. Then launch it.
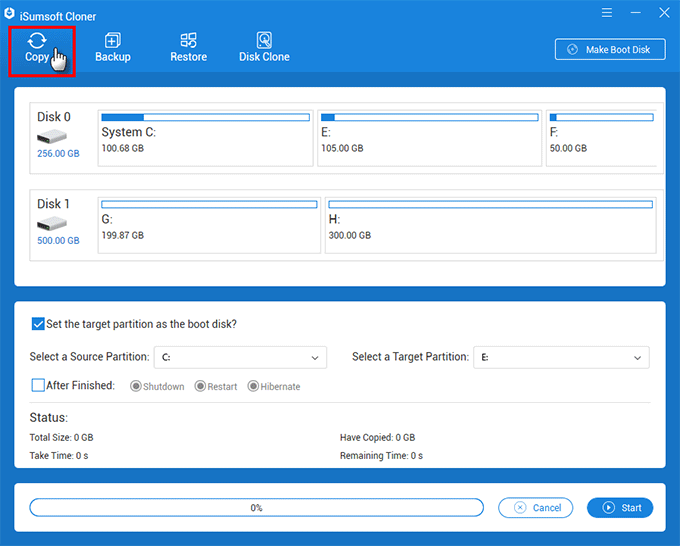
Step 5: Click Copy.

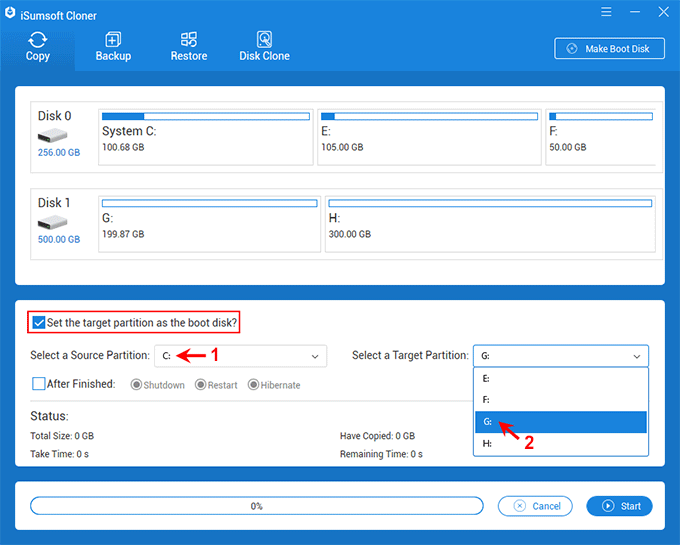
Step 6: The program will show all available discs and partitions, including your newly added SSD. Check Set the destination partition as the boot disk. Select the partition where Windows 11 is installed as the source partition and the new SSD as the destination partition.

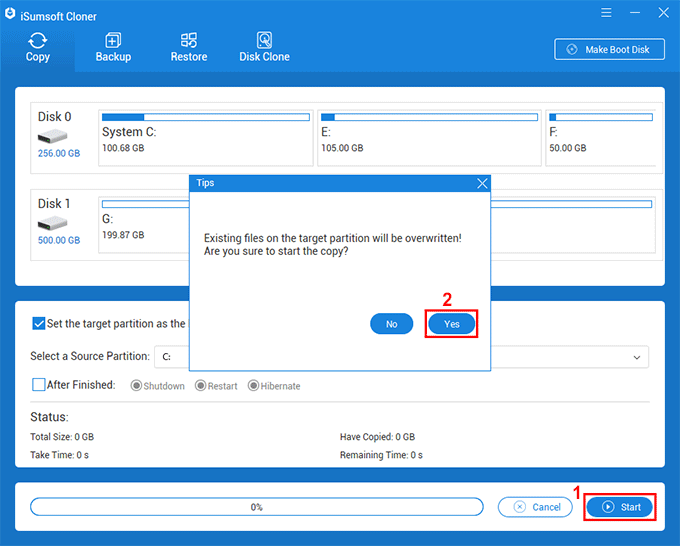
Step 7: Click Start. If asked Yes or No, click Yes to continue.

Step 8: When "The Copy Completed Successfully" appears, click OK.

Step 9: Locate the new SSD, you can see the backup folder.

Step 10: Reboot your computer. During the startup, press the hotkey, depending on your computer model, to access the Boot device menu. Learn hotkeys to enter Boot menu device.
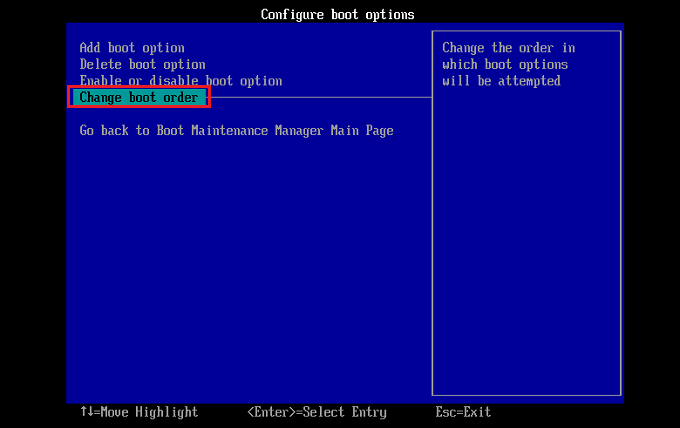
Step 11: Enter Change boot order.

Step 12: Use "+" key to move the new SSD to the top of the list, then hit Enter.

Step 13: Once you access the desktop, right-click on the Start icon and select Disk Management.

Step 14: Here, you will find that Windows 11 is installed in the new SSD.

Let's first understand the difference between MBR and GPT:

Based on the table, a few simple rules are summarized here to help you decide what to choose:
No, replacing the SSD will not cause you to lose your Windows 11 license. Windows 11 licenses are usually tied to the computer hardware (especially the motherboard) rather than the storage device. As long as you reinstall Windows 11 on the same computer and have a valid license, you can reactivate it after replacing the SSD without any issues.
When installing Windows 11 on a new SSD, you may be prompted for a license key during the installation process. If you have a retail license, you can enter your product key to activate Windows 11. If your digital license is tied to a Microsoft account, you can sign in with your Microsoft account during the installation process and Windows 11 will be activated automatically when you connect to the internet.
If you encounter any activation issues after cloning, visit Microsoft Support or read this article.