It is not surprising that various issues arise after updating iOS and iPhone stuck on Do Not Disturb mode is one of the most discussed issues. This article will delve into the causes behind it and show you how to fix iPhone stuck on Do Not Disturb after update.

You must be curious about why your iPhone gets stuck in the Do Not Disturb mode. Here are some common reasons:
Do Not Disturb is scheduled: If you have it scheduled to turn on at certain times, you won't be able to turn it off manually until the scheduled time has passed.
A Focus mode is enabled: Focus mode is a new feature in iOS 15 that allows you to filter out specific notifications and apps based on your current activity. If you have a Focus mode enabled, it may be preventing you from turning off Do Not Disturb mode.
Your iPhone is glitching: After a recent software update or conflicting settings, there may be a temporary glitch or error in the settings or software of your iPhone, causing it to get stuck in Do Not Disturb mode.
Your iPhone is in Airplane Mode: When your iPhone is in Airplane Mode, all wireless connections are turned off, resulting Do Not Disturb mode turning on automatically.
Physical issue: Physical issues with the hardware like buttons or sensors may prevent your iPhone from recognizing your input to disable Do Not Disturb mode.
Swipe from the top-right corner to open Control Center. Locate and tap on the Do Not Disturb icon, which looks like a crescent moon, to disable it. Once disabled, its background color will turn transparent, indicating that Do Not Disturb mode is off.

Go to Settings > Focus > Do Not Disturb, then toggle the button to turn it off.

Check if you've turned on Sleep focus, it will turn on Do Not Disturb mode automatically for fewer interruptions. Follow these steps:
1: Tap Settings> Focus > Sleep, then tap on your schedule and toggle the button to disable it.

During the scheduled time, you're not allowed to turn off the DND mode unless you delete the schedule you set. Here is how to delete the schedule to fix iPhone stuck on Do Not Disturb mode:
Go to Settings > Focus > Sleep > Delete Focus.

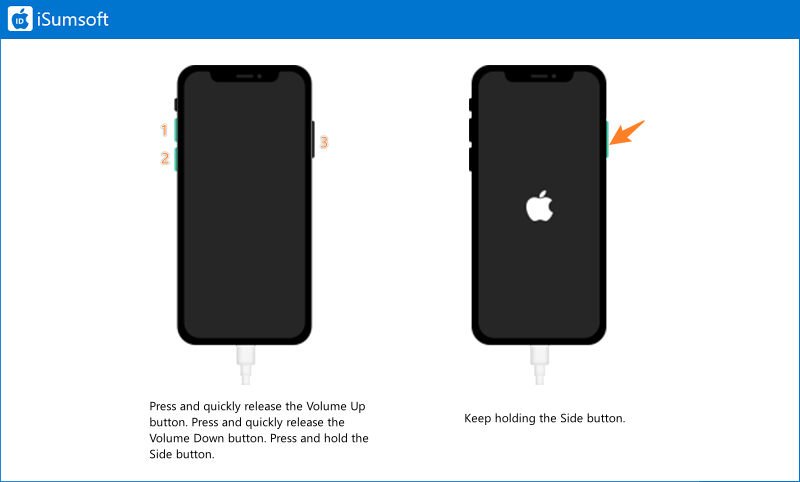
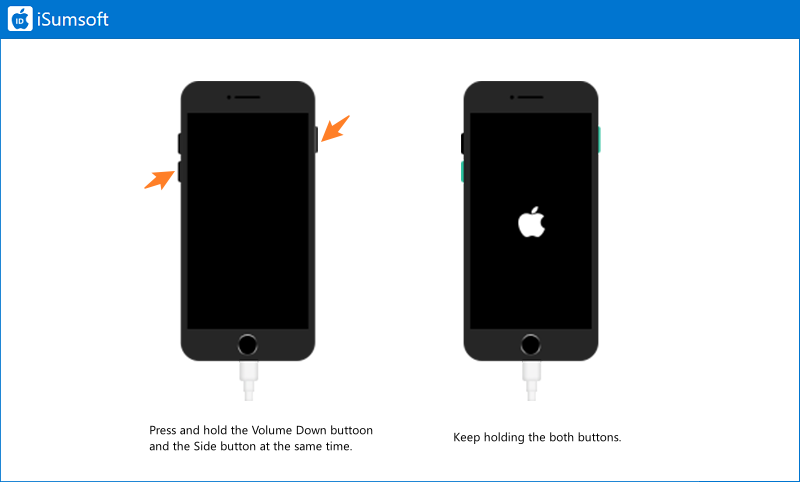
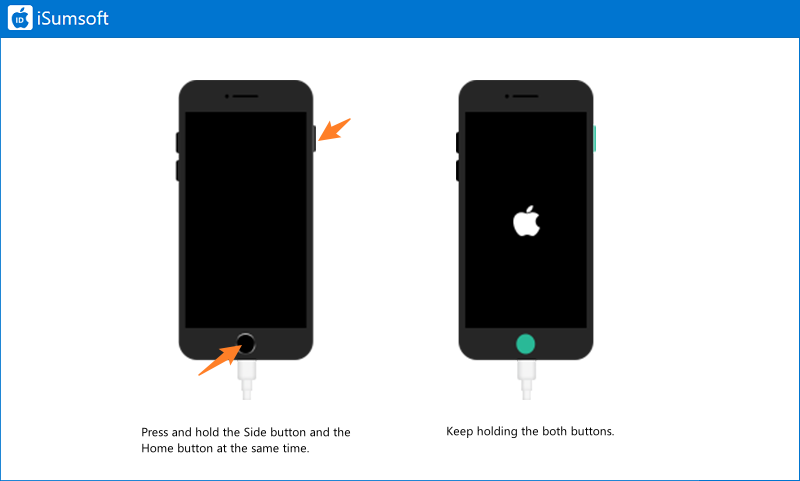
Force restarting iPhone may help you solve this issue. Learn how to force restart your iPhone:
For iPhone 8 and later

For iPhone 7 and iPhone 7 Plus

For iPhone 6s and iPhone SE

Have you tried resetting all settings? Different settings may lead to configuration conflict. Try to reset all iPhone settings to solve Do Not Disturb can't be turned off on iPhone.
On Settings, tap General > Transfer or Reset iPhone > Reset > Reset All Settings, then enter your screen lock passcode to complete the process.

Once the Driving Focus feature is enabled, your iPhone is set to Do Not Disturb mode automatically when you're driving. Follow these steps:
From Settings, tap Screen Time > Content & Privacy Restrictions, then locate Driving Focus (if you have set a screen time, you are asked to enter your screen time passcode) and select Don't allow.

You can also use iTunes to fix iPhone stuck on Do Not Disturb, which restores your iPhone by erasing your media and all other data. Here is how to use iTunes:
Step 1: Connect your iPhone to a computer installing Windows 10 and later.
Step 2: Put your device into Recovery Mode.
Step 3: When asked to Update or Restore, click Restore and follow the onscreen instructions to complete the process.

The last resort is that you can use a professional tool, iSumsoft iOS Refixer, to repair your iPhone. It provides you with two repair modes - one is Standard Mode (no data loss) and the other is Advanced Mode (data erased) - to resolve various iOS-related issues. Learn how to use this software:

iSumsoft iOS Refixer
Step 1: Free download iSumsoft iOS Refixer, then connect the iPhone to your PC and launch the software.
Step 2: Select System Repair.

Step 3: Select Standard Repair.

Step 4: Click Start to repair your device.

Step 5: You need to download a match firmware package. Click Download to proceed.

Step 6: After the successful download, click Repair to fix iPhone stuck on Do Not Disturb issue.

Step 7: Wait for the process to complete. When you see "Repair Successfully", your iPhone will start by itself and the problem has been resolved.
