Microsoft Office allows quickly insert the current date and time into the body of a document as well as into the header and footer. This post describes 4 options to insert date time and have it update automatically in Word document.
Word offers handy keyboard shortcuts to insert the date and time:
To have Word automatically update the date and time when you open or print the document, use these steps.
Step 1: Click in your document where you want the date and time to appear.
Step 2: Click the Insert tab, then click Date & Time button.

Step 3: Click the date and time in the format that you want. Select the Update automatically check box. Click OK when finished.

When you run open this document on another day, the current date displays.
You can put the PrintDate field into the header of important documents, which lets people know the date was printed.
Step 1: Click the Insert tab.
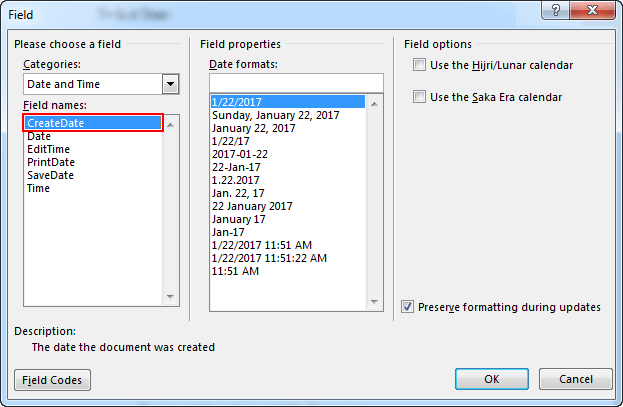
Step 2: In the Text group, choose Quick Parts > Field.

Step 3: Select Date and Time from the Categories drop-down list. Select PrintDate from the Field Names list.
Step 4: In the Field Properties section of the Field dialog box, choose a date-and-time format.
Step 5: When done, click OK.

Tips: The date may not update in your document unless you close, then re-open the file or right-click the field and select Update Field.

You can make the date and time appear in the headers or footers, use these steps:
Step 1: Double-click the header or footer of your document to bring up the Header & Footer Tools ribbon.
Step 2: Click the Design tab in the Header & Footer Tools ribbon. Click the Date & Time button.
Tips: This tab contains the Insert group, but it is not the same as the Design tab on the regular ribbon that contains a gallery of format thumbnails.

Step 3: In Date and Time dialog box, click format that you want to use and then click the Update Automatically check box. Click the OK button to close the dialog box when done.

You will see the formatted date displays in the header or footer.
You can see the makeup of the Date and Time field by simply selecting it in the header or footer and pressing Shift + F9. You can also edit the Date and Time by setting its Font theme, Size, Color or others in Word. Double-click in the document body can exit the header or footer.
