Windows 10 can run on all kinds of devices such as desktop, laptop, tablet, surface, and even phone. In order to allow users to better experience Windows 10 on different device platforms, Microsoft designed the Continuum feature in Windows 10 that enables users to freely switch between tablet and desktop mode. Now this page introduces how to enable or disable tablet mode in Windows 10.
Way 1: Enable/disable tablet mode in Windows 10 through Action Center
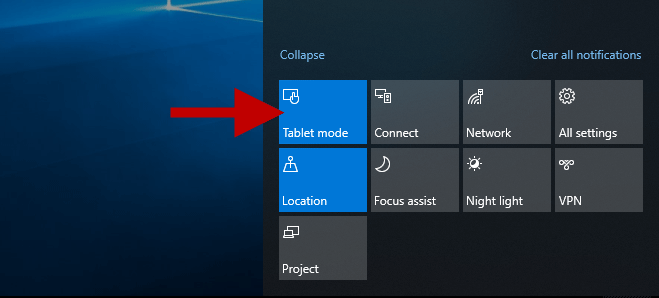
Step 1: Click on the Notification icon at the far right of the taskbar to bring up the Action Center menu.
Step 2: Click Tablet mode to turn it on (blue). Click it again to turn it off (gray).
Way 2: Enable/disable tablet mode in Windows 10 via Settings
Step 1: Press Win + I keyboard shortcuts to quickly bring up Settings panel.
Step 2: Click the System.
Step 3: On the left-side pane select Tablet mode. Then on the right-side pane switch the toggle button under “Make Windows more touch-friendly when using your device as a tablet” to On position to enable tablet mode. Switch the button to Off to disable tablet mode and go back to desktop mode.
Once tablet mode is enabled, Windows 10 immediately switches from desktop to tablet mode. Your opened apps will immediately go full screen and the Start menu switches to Start screen. You can see the entire screen is more touch-friendly. To continue setting up tablet mode, continue with the following steps.
Step 4: Click the drop-down under When I sign in and select one option to tell Windows 10 whether to go to the desktop or to switch to tablet mode each time you sign in. If you are using a tablet or touch-screen device, then you can select Automatically switch to tablet mode.
Step 5: Toggle the button under the Hide app icons on the taskbar in tablet mode to On or Off depending on your own needs.
